|
WebWorks Publisher Standard Edition Project Basics
|


User interface basics
This section provides an overview of the most-used windows and dialog boxes in WebWorks Publisher Standard Edition:
- The "shell" of the application. All open projects are displayed within this window. See page Application window for details.
- A window that visually displays the project's hierarchy on one tab and project options on another. See page Publisher project window for details.
- Lets you edit style mappings. See page Properties dialog box for details.
For details about the Project Launcher dialog box and New Project wizard, see Creating a new project.
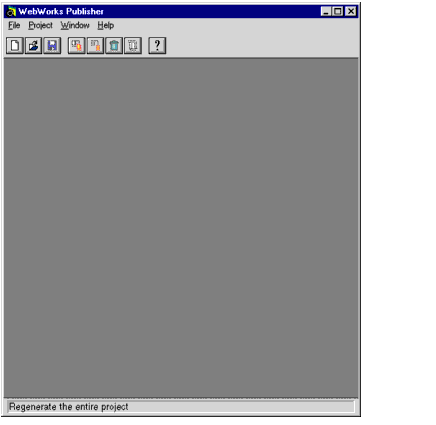
Application window
When you first open the WebWorks Publisher Standard Edition application, the application window opens:
| Note: |
In most cases, the Project Launcher dialog box is displayed automatically to let you create a new project or open an existing one. |
Open projects are displayed within the application window. You access common commands and other areas of the application through the window's menus and toolbar buttons. Table 16 describes the function of these buttons.
Table 16: Toolbar buttons in the Application window
| Button |
Name |
Description |
| |
New project |
Displays the Project Launcher dialog box. |
| |
Open project |
Displays Select Project File to Open dialog box |
| |
Save project |
Saves current project. |
| |
Regenerate project |
Creates output files for the entire project. |
| |
Regenerate selected file |
Creates output files for the selected FrameMaker file. |
| |
Delete generated files |
Deletes all output files. |
| |
View generation log |
Displays the Generation Log dialog box. |
| |
Help |
Opens a web browser and loads the online help for WebWorks Publisher Standard Edition. |
Publisher project window
Each WebWorks Publisher Standard Edition project is displayed in a project window with the project name at the top.
The window contains two tabs:
- Contains the file tree view, a list of the files that make up your project. See "Understanding the file tree view" for details.
- Lets you set project-specific options, such as file locations. See Setting project options for details.
Understanding the file tree view
The file tree view shows how your project is organized. Double-click a file name or icon to view FrameMaker source files or text and graphic output files.
As in other tree views (such as in Windows Explorer), to expand a view, click the + icon; to collapse the view, click the - icon.
Here's how the tree view is organized:
- FrameMaker and Generated Files folder
- Contains all of the FrameMaker source files and their resulting output files. Each FrameMaker file in the folder also contains these subfolders:
- The help pages that Publisher generated. Each page represents one output file (such as one web page).
- Graphics folder (displays only if the source file contains graphics)
- The graphics Publisher generated. Each graphic represents one anchored frame from the source documents.
- Contains files that Publisher uses during conversion, such as the page definition files.
The icons in the file tree view help identify the file type and indicate when a file is missing or hasn't been generated yet. Table17 describes the icons found in the tree view.
Table 17: File tree view icons
| File present or generated |
File missing or not generated |
Description |
Double-clicking icon opens... |
| File Icons |
|
| |
|
Default file icon (used for all files that do not have a specific icon defined in the list below, often .txt files) |
Default text editor (such as Notepad) |
| |
|
FrameMaker document |
FrameMaker |
| |
|
Output page document |
Default web browser (.rtf files open in default word processor) |
| Graphic Icons |
|
| |
|
GIF graphic |
Default web browser |
| |
|
JPEG graphic |
Default web browser |
| |
|
PNG graphic |
Default web browser |
| |
|
BMP graphic |
Default graphics editor |
Properties dialog box
The Properties dialog box lets you map FrameMaker styles to corresponding Publisher styles. You can map styles for the entire project or for one file. Here's how to launch the dialog box:
- To map styles for the whole project, select the FrameMaker and Generated Files folder in the file tree view; to map styles for one file only, select the file name.
- Do one of the following:
- Select Project » Properties.
- Right-click the file name and click Properties from the pop-up menu.
The Properties dialog box is displayed.
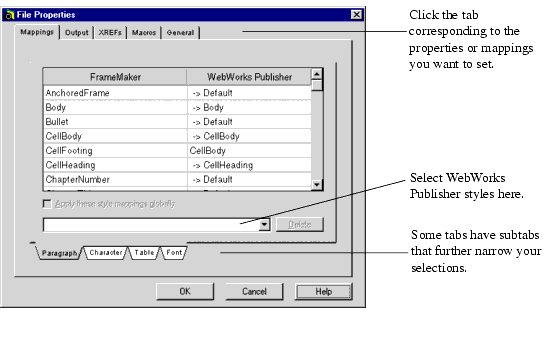
To view or edit mapping details and other settings, click one of the upper tabs:
- Lets you edit style mappings. Click the subtab corresponding to the style you want to map.
- Lets you map page and graphic output mappings. Click the subtab (bottom tab) corresponding to the kind of output whose mapping you want to edit.
- Lets you redefine cross-reference formats so they make sense in a help system (such as removing page references).
- Lets you edit user macros (at the file level only). To edit user macros at the project level, select the FrameMaker and Generated Files folder, then edit the macro. This will change the macro for all files without changing the default value.
- A view-only tab that lists file details (name, type, size, and modification date) for the selected project or individual file within the project.
See Chapter 7, "Mapping FrameMaker Styles to WebWorks Publisher Styles,"Getting Started for details on using this dialog box.

Quadralay Corporation
http://www.webworks.com
Voice: (512) 719-3399
Fax: (512) 719-3606
sales@webworks.com
|