|
Working with Project Files
|


Adding, rearranging, and deleting project files
After you create a project, you can add, delete, and rearrange FrameMaker files in the project.
Adding files to a project
You can add a file to a project by dragging and dropping the file into Publisher or by using the Add File to Project dialog box.
Adding files using drag-and-drop (Windows only)
To add files using the drag-and-drop method, select the file(s) or directory from Windows Explorer, then drag and drop the files into the tree view of the main Publisher Project window.
FrameMaker files added using drag-and-drop are displayed at the top of the file list, and other types of files, such as graphics files, are added to the Support directory.
Adding files using the Add File to Project dialog box
Unlike the drag-and-drop method, adding files using the Add File to Project dialog box lets you determine where in the project hierarchy the files are inserted.
Here's how to add a file using the dialog box:
- From the main Publisher Project window, do one of the following:
- Select Project » Add Files.
- Right-click any file in the tree view of the main Publisher Project window and click Add on the pop-up menu.
- The Add File to Project dialog box is displayed.
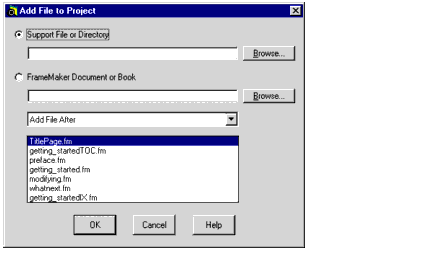
- To add a graphic or text file to the Support Directory, select the Support File or Directory radio button, then click the Browse button to select the file to be added from the Select File to Add dialog box.
- To add a Framemaker document or book file to the project, select the FrameMaker Document or Book radio button, then click the Browse button to select the file to be added from the Select File to Add dialog box.
- Specify where the file should be located in the project by selecting either Add File After or Add File Before from the drop-down list then selecting a file name in the text box.
- Click OK.
Rearranging project files
Here's how to rearrange project files:
- From the main Publisher Project window, do one of the following:
- Select Project » Rearrange Files.
- Right-click any file in the tree view of the main Publisher Project window and select Rearrange on the pop-up menu.
- The Arrange Project Files dialog box is displayed.
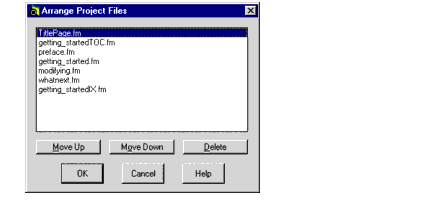
- To move a file up or down the file list, select the file, then select the Move Up button or the Move Down button.
Note: You can also delete files from this dialog box by selecting the file you want to delete and clicking the
Delete button.
Deleting project files
The Delete option removes the FrameMaker files from the project tree view and deletes its generated files (the FrameMaker files are not deleted from your computer).
Here's how you delete a project file:
- Select the file in the tree view of the main Publisher project window, then do one of the following:
- Press the Delete button on your computer's keyboard.
- Select Project » Delete Files.
- Right-click the file name or icon, select Delete on the pop-up menu, then click Yes.
Note: If you want to delete all generated files for troubleshooting purposes, select
Project » Delete Generated, or click the
Delete All Generated Files toolbar button

. All generated files are deleted, but mappings, style definitions, and other project settings are retained.
- WebWorks Publisher Standard Edition displays a confirmation prompt.

- To delete the file, click the Yes button.
Note: You can also delete files using the Arrange Projects File dialog box. Use this dialog box if you need to delete several files. See
Rearranging project files for details.

Quadralay Corporation
http://www.webworks.com
Voice: (512) 719-3399
Fax: (512) 719-3606
sales@webworks.com
|